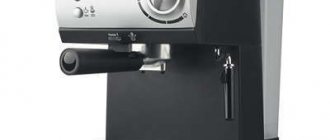
Coffee makers for home use have a simple design. They consist of a water tank, pump, boiler, horn, valves and thermostats. They have slight differences in functionality, but the principle of operation is similar for all. Next, we will study in detail how the Vitek vt 1511 coffee maker works.
When choosing a coffee maker for your home, you need to approach it consciously - evaluate all the positive and negative characteristics of the product. Moreover, the market is replete with various offers of such products. It is difficult for an inexperienced person to immediately know which model is better. To find out, first study the properties of a particular device and decide what requirements you have for coffee machines. Only then make a choice. In this article, we will look at all the pros, cons, and the operating principle of one of them - in principle, the Vitek vt 1511 coffee maker can become an indispensable assistant in your kitchen in preparing espresso and other types of coffee.
Russian
Page 8
- Image
- Text
21
RUSSIAN
product, rinse and dry them.
Drip tray (9)
— Remove the grid (10) from the tray (9),
remove the tray (9) and drain the water from it, put the tray in place, install the grill on the tray.
If necessary, the tray (9) and re-
The screen (10) can be washed with water and a mild detergent, rinsed and dried.
Malfunctions, their causes and methods of elimination
Malfunction
Cause
Elimination method
Coffee maker won't turn on
There is no voltage at the power outlet. The power cord plug is not fully inserted into the outlet.
Make sure the power outlet is working. Check that the plug is fully inserted into the socket.
Water leaks from the bottom of the coffee maker
The water tray is full.
Drain the water from the pan
Coffee leaking from the filter holder
The filter does not fit tightly to the seal in the boiler; ground coffee gets onto the edges of the filter.
Clean the edges of the filter.
The brewed coffee has an odd odor
Incorrect descaling process in the coffee maker boiler
Improper coffee storage
Refer to the sections “Preparing for work”, “Descaling”, and do them several times.
Use freshly ground coffee. Store coffee in a cool, dry place.
Steam does not froth milk
Low steam temperature The container is too large or the wrong size You used skim milk
Froth the milk only after the indicator (15) lights up. To froth milk, use narrow, tall dishes. Use only whole milk with a fat content of 4-6%.
FOR HOME USE ONLY
Does not contain replaceable parts.
Technical data
Supply voltage: 230 V ~ 50 Hz Power consumption: 1050 W
The manufacturer reserves the right to change the design and technical characteristics of the device without prior notice.
Device service life - 5 years
This product meets all required European and Russian safety and hygiene standards.
AN-DER PRODUCTS GmbH, Austria Neubaugürtel 38/7A, 1070 Vienna, Austria
1511.indd 21
1511.indd 21
03.02.2010 15:36:17
03.02.2010 15:36:17
Coffee maker VITEK VT-1511 owner reviews
Advantages:
- coffee maker VT-1511 low noise;
- convenient to use;
- cooks quickly;
- not expensive;
- makes delicious coffee;
- the foam is high, thick and beautiful;
- high pressure;
- compact dimensions;
- economical;
- you can easily add water without removing the tank;
- The coffee maker is easy to clean;
- has a nice design.
Flaws:
- the VT-1511 BK coffee maker has a not very convenient cappuccino maker;
- poor heating of cups;
- no suction cups, slides on the table;
- picky about grinding coffee.
The reviews are based on 79 user reviews in Yandex Market. We hope the customer reviews helped you and you will make the right decision.
***
Page 9
- Image
- Text
1511.indd 60
1511.indd 60
03.02.2010 15:36:20
03.02.2010 15:36:20
Comments
Select → I found the instructions for my coffee maker here! #manualza
- Click →
Simple instructions for creating a perpetual motion machine: - Me and a rake.
Manualza!manualza.ru
Still not with us?
Download instructions VITEK VT1511BK
PDF manual file size 0.2mb
1511.indd 11511.indd 02/103/2010 15:36:1403/02/2010 15:36:14 2 1511.indd 21511.indd 02/203/2010 15:36:1603/02/2010 15:36:16 16 COFFEE ARC A ESPRESSO/K APUCINO DESCRIPTION 1 ЂЂЂ Coffee maker body 2 ЂЂЂ Water container lid 3 ЂЂЂ Removable water tank 4 ЂЂЂ Cup warming platform 5 ЂЂЂ Steam control knob 6 ЂЂЂ Coffee filter 7 ЂЂЂ Cappuccino tube with tip 8 ЂЂЂ Filter holder handle 9 ЂЂЂ Tray for drops 10 ЂЂЂ Tray cover 11 ЂЂЂ Filter holder 12 ЂЂЂ Filter holder 13 ЂЂЂ Water supply button 14 ЂЂЂ Steam button 15 ЂЂЂ Ready indicator 16 ЂЂЂ Power on indicator 17 ЂЂЂ Button on/off switch (ON/OFF) 18 ЂЂЂ Measuring spoon with seal can - loto coffee IMPORTANT PRECAUTIONS When using electrical appliances, basic safety precautions should always be followed, including: • Read all instructions carefully. ЂЂЂ Use the coffee maker only for its intended purpose. ЂЂЂ Make sure that the voltage of the electrical network matches the voltage indicated on the device body. ЂЂЂ Use a power outlet with a reliable grounding contact. • To reduce the risk of fire, do not use adapters when connecting the appliance to an electrical outlet. ЂЂЂ Do not turn on the coffee maker without water. ЂЂЂ Use only the accessories included in the package. ЂЂЂBefore turning on the coffee maker, make sure that all removable parts are installed correctly. ЂЂЂ Do not touch hot parts or surfaces of the coffee maker. ЂЂЂBe careful when working with escaping steam. ЂЂЂ Do not remove the filter holder while the coffee maker is operating. ЂЂЂRelease the steam from the cappuccino wand before removing the filter holder. ЂЂЂ Install the device on a flat, stable surface. ЂЂЂ Do not leave the operating device unattended, be especially careful if there are children or people with disabilities near the operating device. • To reduce the risk of fire, electric shock, or physical damage, do not immerse the power plug, power cord, or coffee maker in water or other liquids. – Always unplug the coffee maker from the electrical outlet when not in use or before cleaning. ЂЂЂ To disconnect the coffee maker from the network, set all control buttons to the off position, and then unplug the power plug from the socket. • Make sure that the power cord does not hang over the edge of the table or come into contact with hot surfaces. ЂЂЂ Do not place the coffee maker on hot surfaces. ЂЂЂ Do not use the coffee maker with a damaged power plug, a damaged power cord, if it is not working properly, or if it has been damaged in any way. ЂЂЂ It is forbidden to repair the coffee maker yourself. For repairs, contact your nearest authorized service center. ЂЂЂ Do not use the coffee maker outdoors. RUSSIAN 1511.indd 161511.indd 1603.02.2010 15:36:1703.02.2010 15:36:17 17 ENGLISH – Never leave the coffee maker in places with temperatures below 0`C. ЂЂЂFor home use only. – This appliance is not intended for use by children or persons with reduced mobility unless they have been given instructions and instructions that they can understand about the safe use of the appliance and the hazards that may arise if it is not used correctly by a person responsible for their safety. ЂЂЂDo not allow children to use the device as a toy. SAVE THESE INSTRUCTIONS PREPARATION FOR OPERATION – Make sure that all control buttons (13, 14, 17) are in the off position. ЂЂЂ Make sure that the steam supply is closed; to do this, turn the handle (5) clockwise until it stops. ЂЂЂBefore using the coffee maker for the first time, wash all its removable parts with warm water and dry. ЂЂЂBefore turning on, make sure that the voltage of the electrical network corresponds to the voltage indicated on the device body. ЂЂЂ Remove the container (3), fill it with cold water up to the MAX mark and put it in place. ЂЂЂ Insert the coffee filter (6) into the holder (12), aligning the protrusion on the filter (6) with the slot in the holder (12) and turn the filter (6) clockwise/counterclockwise. ЂЂЂ Place the filter holder into the coffee maker. The protrusions of the holder (12) must coincide with the grooves on the boiler, then turn the handle of the filter holder (8) to the right until it stops. ЂЂЂ Place a suitable cup on the lid of the tray (10).ЂЂЂ Insert the power cord plug into the socket. ЂЂЂ Turn on the coffee maker by pressing the ON/OFF button (17), the indicator (16) will light up. ЂЂЂ To fill the boiler with water, press the button (13) after 15-20 seconds or at the first sign of water appearing in the cup, turn off the water supply by pressing the button (13) again. ЂЂЂ Wait until the indicator (15) lights up, then turn on the water supply by pressing the button (13), after filling the cup with water, press the button (13) again to turn off the water supply, drain the water from the cup. Depending on the volume of the cup, carry out this procedure several times, after which the boiler will be rinsed. Attention! — Do not remove the filter holder (12) while pressing the buttons (13), (14) — Do not remove the filter holder (12) immediately after making coffee, as there may be excess water and steam pressure inside the filter, wait until it cools down coffee makers — To remove the filter holder (12), turn the handle to the left and remove the holder. PREPARING ESPRESSO COFFEE – Make sure that all control buttons (13, 14, 17) are in the off position. ЂЂЂ Make sure that the steam supply is closed; to do this, turn the handle (5) clockwise until it stops. ЂЂЂ Remove the container (3), fill it with cold water up to the MAX mark and put it in place. ЂЂЂ Insert the coffee filter (6 or 19) into the holder (12), aligning the protrusion on the filter (6) with the slot in the holder (12) and turn the filter (6) clockwise/counterclockwise. ЂЂЂ Pour ground coffee into the filter (6): 2 full measuring spoons - for preparing two cups of coffee and 1 full measuring spoon - for preparing one cup of coffee, lightly tamp the ground coffee with the back of the measuring spoon (18). ЂЂЂ Place the filter holder into the coffee maker. The protrusions of the holder (12) must coincide with the grooves on the boiler, then turn the handle of the filter holder (8) to the right until it stops. ЂЂЂ Place one or two cups on the lid of the tray (10). ЂЂЂ Insert the power cord plug into the outlet. ЂЂЂ Turn on the coffee maker by pressing the ON/OFF button (17), the indicator (16) will light up. ЂЂЂ Wait until the indicator (15) lights up, the coffee maker is ready to brew coffee. ЂЂЂ Turn on the water supply by pressing the button (13), watch the process of filling the cup with the prepared coffee, press the button (13) again to turn off the water supply. ЂЂЂ Turn off the coffee maker by pressing the ON/OFF button (17), the indicator (16) will go out. ЂЂЂ Wait for the coffee maker to cool down and remove the filter holder (12) by turning the handle to the left. Remove any remaining ground coffee and rinse the filter (6). Note: — The cups used must be preheated; while heating the water in the boiler, place the cups on the platform (4). — If there is an emergency need to remove the filter holder, it is necessary to reduce the pressure in the boiler, turn off the coffee maker by pressing the ON/OFF button (17), place a suitable cup under the cappuccino tube and slightly open the steam supply by turning the regulator (5) counterclockwise, after releasing pressure in the boiler, remove the filter holder (12). PREPARATION FOR APUCINO Attention! Beware of being burned by the hot steam escaping. ЂЂЂ Make sure that the steam control knob (5) is in the “steam off” position. ЂЂЂBrew the coffee as described in the section “PREPARING ESPRESSO” in a cup large enough to add frothed milk or cream. ЂЂЂ Press the steam button (14), wait until the indicator (15) lights up. Place any suitable container under the cappuccinatore tube (7) to collect water. Carefully turn the steam knob (5) counterclockwise a quarter turn to remove any condensation remaining in the steam wand. After removing the condensate, close the steam supply by turning the handle (5) clockwise until it stops. Note: A small amount of water or steam may come out of the filter holder (12) or steam nozzle, this is normal. ЂЂЂ Place the cappuccino tube (7) into a glass of cold milk or cream, carefully turn the steam control knob (5) counterclockwise a quarter turn or more. The cappuccino tube should not touch the bottom of the glass, otherwise the steam will be difficult to escape; a few seconds are enough to obtain thick foam. ЂЂЂ Close the steam supply by turning the handle (5) clockwise until it stops. ЂЂЂ Turn off the steam supply by pressing the steam button (14) again. 1511.indd 181511.indd 1803.02.2010 15:36:1703.02.2010 15:36:17 19 ENGLISH – Turn off the coffee maker by pressing the ON/OFF button (17), the indicator (16) will go out. Important: - It is important that the milk used to prepare the foam is fresh and without preservatives, that is, not the so-called shelf-stable milk. Regular whole milk with a fat content of 4 to 6% is used, the fat content of the cream should be at least 10%. — Immediately after frothing milk or cream, clean the cappuccino tube (7) - to do this, lower the cappuccino tube (7) into a glass of water, turn on the steam supply by pressing the button (14) and turn the steam supply knob (5) counterclockwise to release a small amount of steam, then close the steam supply and turn off the coffee maker. — Wait for the coffee maker to cool down and remove the
Ask the master “What should I do?” - They will answer you as soon as possible.
Using the instructions for the VITEK VT1511BK coffee machine is free. The VITEK VT1511BK operating instructions are available for download from open sources.