Basics of coffee art
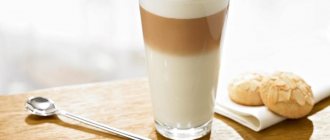
Drawings using different techniques are made on a coffee drink with dense milk foam - cappuccino. Less commonly, espresso and latte are decorated in this way. The contrasting image is obtained due to the fact that the white foam does not occupy the entire surface of the cup. This is achieved by pouring the frothed milk unevenly or by raising dark coffee to the top.
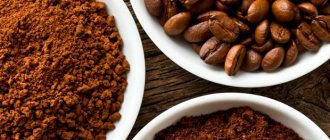
The color of the design will be richer if you sprinkle the surface of the espresso with cocoa powder, and then pour in the milk. To draw on milk foam, depending on the chosen technique, you will need:
- a thin wooden stick (a toothpick will do);
- pitcher, or milk jug (small steel jug with
- sharp spout for frothing milk);
- stencils;
- strainer;
- sprinkles (cinnamon, cocoa, grated chocolate, crushed
- nuts);
- syrup.
All the necessary equipment can be purchased in stores specializing in coffee, coffee makers and coffee machines. Milk should be whipped with a cappuccino maker directly in the milk jug so as not to overfill the hot foam.
Historical information
The appearance of latte art is closely connected with the history of espresso, which was invented in Italy at the turn of the 20th century. This coffee drink began to rapidly spread throughout the world. Soon, many cafes began offering espresso with designs.
At the end of the 1980s. American specialist in roasting coffee beans D. Schomer began experimenting with various forms of latte art and in 1989 presented his own method of creating a rosette. Soon he founded an educational course and began teaching those interested in the art of latte art. The new direction quickly spread throughout the United States and the world.
Coffee art techniques
There are several ways to decorate coffee. Some techniques are within the capabilities of anyone, while others must be mastered over a long period of practice. The easiest way to draw on cappuccino is not to mix the layers, but just on top of the drink. Stencil. With the help of a stencil and powder, even a beginner can draw on coffee at home. Template sets include pictures of various themes, patterns and inscriptions. You need to hold the stencil over the finished drink and pour cocoa or cinnamon into the slits through a strainer. Sometimes grated chocolate is also used.
You can buy cappuccino stencils or make your own. To do this, cut out a circle from thick cardboard with a diameter slightly larger than a coffee cup. Then they make an inscription or image from individual elements, and then cut them out with a stationery knife. The thinner the slits, the more beautiful the image will be.
On dense foam, the pattern lasts up to 10 minutes.
Engraving. Usually combined with other, more complex techniques. Draw with a pastry syringe with syrups (toppings). With a thin line you can draw the most intricate figures. To prevent the drawing from sinking, the tip of the syringe must be kept very close to the surface of the cappuccino.
Secrets of creating drawings
There are several nuances that, if followed, will help improve your drawing skills.
For black coffee
Traditionally, they are painted on a thin, dense layer of milk foam, which serves as a support. However, the pattern can easily be applied to black espresso. To do this, you need to sprinkle the surface of the drink with cocoa powder or cinnamon, after which a pattern is created.
For coffee with milk foam
To apply the design to the coffee film, you need to froth the milk correctly. The foam should be dense and contain microbubbles. Thanks to this, the image can last at least 15 minutes. To achieve this result, you need to beat the product cooled to +3°C.
Basic elements of pitching technique
To understand how frothed milk behaves and how to draw on coffee using a milk jug, you need to master a few simple shapes. Then, based on them, you can learn to make more complex drawings.
Heart
This easy-to-make element is invariably popular in coffee shops. You need to pour the milk into the center of the cup to form a circle. Cross out the white spot with a thin stream, raising the milk jug higher. A depression will appear at the top, and a pointed tip at the bottom.
Star
Make a white circle in the middle of the cup and pour in the milk. Trace the topping around the outline using a pastry syringe. At some distance, make a circle of larger diameter. Using a toothpick, draw several lines from the center of the stain to the edges of the cup.
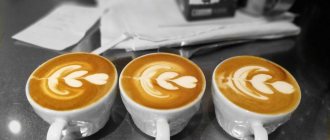
Rosetta
This figure is similar to a leaf or flower. The espresso cup is held at a slight angle. Milk foam is poured in, making semicircular lines one above the other with the pitcher, gradually reducing their length. Then, moving downwards, you need to cross out the lines, drawing a stem. The lines will bend slightly and pull down.
Anyone can create latte art on cappuccino coffee foam. It is not difficult to master stenciling or engraving techniques, and real coffee art artists endlessly hone their skills.
How to draw a realistic glass of coffee in Photoshop
In this tutorial I will show you how to create a realistic coffee glass using Photoshop Smart Objects.
Materials:
Archive
Step 1. Let's start by creating a document sized 1500x2200 px with a resolution of 300dpi. Fill the background with #c2c2c2 color.
Step 2. Below, the individual parts of the glass are shown in different colors.
Step 3. Add auxiliary lines, one vertical in the center at 750 px and one horizontal at 1100 px.
Step 4. Let's start with the glass. Draw an outline using the Pen Tool (P), to create individual parts of the glass, use the Add to path area (+) command. Once one side is created, activate it and press CTRL+ALT+T to copy, then move the central round node to the center of the right line, right-click on the outline and select Flip Horizontal . Create a bottom using the Ellipse Tool (Ellipse) (U), click on the vertical auxiliary line and press ALT to make it symmetrical with respect to the horizontal line. Create a new layer and fill the outline of the glass with white.
Step 5. Repeat the above steps to create the area where the label will be placed.
Step 6. The lid is created in the same way. When you create the bottom part, make sure that the Substract from path area (-) command is enabled.
Step 7. For the back inner part of the lid, copy its lower ellipse and edit the shape using Add to path area (+) and fill it with gray color #adadad .
Step 8. The ring on the lid is created in the same way as the glass. The bottom should be the same width as the lid.
Step 9. Now that all the parts needed for the glass are created, you can edit the document size to approximately 1100x650 px. Make sure all layers are visible and in place as shown below.
Step 10 Now it's time to breathe some life into the composition. Let's start with the glass. Create a shape slightly larger than a glass. Apply a gradient fill as shown below. Create a new layer above the gradient layer. Select the gradient fill and the new layer and press CTRL+E to merge them together. Activate Free Transform (CTRL+T) and adjust the layer to the shape of the glass. Then press ALT+CTRL+G to create a clipping mask for the gradient. Now the gradient layer only affects the glass area.
Step 11. Using the Pen Tool (P) create a contour in the shape of the bottom of the glass. Create a new layer above the gradient layer and name it “Bottom Shadow”. Create a stroke from the outline using a soft brush (B) of black color. Then apply a clipping mask (ALT+CTRL+G).
Step 12 Add a gradient for the lid in the same way as we did with the glass. To edit the contour, use Edit – Transform – Warp (Editing – Transformation – Distortion). Before transforming, do not forget to create a new layer and combine it with the gradient one.
Step 13. In the same way as for the glass, we will create a shadow for the lid. Name the layer “Bottom Shadow of Lid.” We will also need to create light in the upper part, we will use the method described above, but this time we will take a white brush. We call the layer “Light”.
Step 14: Double-click on the layer with the ring on the cover to bring up the Layer Style , apply Gradient Overlay , click OK and then right-click on the layer styles and select Create Layers . . As a result, the gradient fill will appear on a separate layer.
Step 15 . Create a path along the contour of the bottom of the lid ring. Create a new “Bottom Shadow” layer and transform the path into a stroke using a large black brush. On a new layer, create another stroke, but this time use a brush with a smaller diameter. Reduce the Opacity of both layers to 10% and create a clipping mask for each.
Step 16. Draw a new outline. Create a layer above the light layer for the lid. Convert the path into a stroke using a black brush, then go Filter – Blur – Gaussian Blur (Filter – Blur – Gaussian Blur) with a radius of 6px. Reduce Opacity to 30%. Duplicate the layer and place it above the layer with the lid ring, reduce the Opacity to 18%.
Step 17 Double-click on the layer with the back inner part of the lid and apply Gradient Overlay (Gradient Overlay).
Step 18. Now let's create a shadow from the label on the glass. Draw an outline and add a new layer “Label Shadow” above the glass shadow layer. Convert the outline into a stroke using a black brush. Duplicate the layer (CTRL+J) and name it “Label Shadow 2”, reduce the Opacity to 10%. Select the first layer and apply Filter – Blur – Gaussian Blur (Filter – Blur – Gaussian Blur) with a radius of 10 px, reduce Opacity (Opacity) to 40%. Make sure to create a clipping mask for both layers.
Step 19 Create two new layers above the label layer and name them “Left Gradient” and “Right Gradient”. Create a clipping mask for them. Using the Gradient Tool (G) create a gradient fill as shown below. Change the blending mode of both layers to Multiply .
Step 20. To make the glass more rounded, add light to the sides of the label. Draw an outline on each side of the label and create a new layer above the gradient layer we created in the previous step. We call it “Side Light”. Convert the outline into a stroke using a soft white brush, apply a Gaussian Blur , create a clipping mask (CTRL+ALT+G) and set the blending mode to Soft Light .
Step 21. The lid also casts a shadow on the label, so let's create another shadow using the Pen Tool (Pen) (P). Add a new layer above the “Side Light” layer, call it “Lid Shadow” and create a clipping mask for it. Convert the outline into a stroke and blur it a little with the Gaussian Blur , then set the blending mode to Multiply with Opacity 25%.
(Fig.22)
Step 22 Repeat Step 21, but this time call the layer “Lid Shadow 2.”
Step 23. Now let's add graphics to the label, create an outline slightly larger than the label, and fill it with any color. Name the layer “Picture on Label”. Reduce the Opacity of the layer so that you can see what is underneath it. Place this layer above the label layer. Right-click on the layer and select Convert to Smart Object. Now you can transform the layer. Press CTRL+T to bring up Free Transform and go into Warp mode. We are trying to transform the layer as you see below. It is important that everything is neat, otherwise do not count on a good result.
Step 24. Right-click on the “Label Design” layer and select Edit Contents . You can remove the color that fills the object and import the texture. Go to File - Save , this will update the smart object in the original file. The glass should now look like below. If the label turns out distorted, you can always go back to Step 23 and fix it, just press CTRL+T and go to Warp .
Step 25. We return to the window in which we edit the smart object “Drawing on the label”. The text on the label can be placed anywhere, but for a more realistic result, do not place it strictly in the center. We write any text and apply a texture to it or simply fill it with color.
Step 26 To make the text look more realistic, we need to diversify it with color. Let's start by creating a new layer above the text layer and calling it "Gradient". Using the Gradient Tool (G), create a black gradient from the edge to the center, then apply a clipping mask and reduce the Opacity to 28%. Create a new layer above the one you just worked with and call it “Light”. Create a white gradient on the other side and apply a clipping mask. We do the same actions with other text.
Step 27 Create a new layer above the texture layer and call it “Light”, draw a line in the center with a large soft white brush. Reduce Opacity to 15%. Duplicate (CTRL+J) the layer and add a layer mask. Apply a black gradient from bottom to center to the layer mask. Reduce Opacity by 20%. Save and close the window with the “Picture on Label” smart object.
Step 28. The illuminated side of the label is too dark, so change the blending mode of the “Side Light” layer to Screen (Lightening) with Opacity (Opacity) 70%.
Step 29. To prevent the glass from hanging in the air, add shadows. Go to the layer with the glass and duplicate the bottom part. Create a new fill layer in the form of a copy and name it “Shadow”. Place the layer below the background one. Go to Filter – Blur – Motion Blur (Filter – Blur – Motion Blur) with a blur of 225 px, then apply Gaussian Blur (Gaussian Blur) with a radius of 6 px. Duplicate the layer (CTRL+J) and stretch it in width by 120%. Reduce Opacity to 20%. Then we transform the original. Reduce its width by 80% and reduce Opacity (Opacity) by 60%.
Step 30 Select all layers except the background one and press CTRL+G to group them. We call the group “Glass”. Duplicate it and press CTRL+E to combine it into one layer. We reduce the copy to 60% relative to the original and move it to the left side of the document. To make the image more interesting, we will create a depth effect. Go to Filter – Blur – Lens Blur (Filter – Blur – Blur with shallow depth of field) with a radius of 21 px. Duplicate (CTRL+J) the layer and move the new glass to the other side.
Step 31 To add more detail to the image, we will create a small wooden spoon. To do this, we will use the technique with which we created the glass, fill the layer with color and call it “Spoon”. Right-click on the layer and select Convert to Smart Object . Now we must transform the spoon so that it lies in front of the glass. You can always go back and change something if the result does not suit you.
Step 32 . Since we are creating a wooden spoon, we need to create a wood texture for it. Let's move on to editing the smart object. Create a new layer and fill it with color #9f7948. Create another new layer above the previous one. Go to Filter – Render – Clouds (Filter – Rendering – Clouds), press CTRL + T and stretch the layer by 400%. Then go Filter – Blur – Motion Blur (Filter – Blur – Motion Blur) and enter Distance (Distance) 200 px and Angle (Angle) 90 degrees. Next, go to Image – Adjustments – Posterize (Image – Correction – Posterization), enter the value 20 and click OK. Press CTRL+L to bring up Levels and increase the contrast of the image. Now we need to add fibers. Go to Filter – Noise – Add Noise (Filter – Noise – Add Noise), set the value to 50% and click OK. Then Filter – Blur – Motion Blur (Filter – Blur – Motion Blur) with Distance (Distance) 10 px and Angle (Angle) 90 degrees. Change the layer blending mode to Multiply .
To add dimension to the texture, duplicate (CTRL+J) the layer and name the copy “Light”. Invert it (CTRL+I). Press CTRL+L and set the values to 75-1.0-140. Change the blending mode to Screen (Lightening) and reduce Opacity (Opacity) to 50%. Place the layer under the original and slightly move it down. Select all the created layers and add a clipping mask to them (CTR+ALT+G).
Add text to the spoon and apply layer styles. Save the window with the smart object and close it.
Step 34. Hold CTRL and click on the “Spoon” layer thumbnail to load the selection. Create a new layer under the spoon layer and fill the selection with black. Duplicate (CTRL+J) the layer. We call the copy “Side” and the original “Shadow”. Press CTRL+T to transform both layers and move them down slightly so that the spoon becomes voluminous. Activate the “Side” layer and use a black brush (B) with a hardness of 100% to fill the empty edge of the spoon to connect its top and bottom parts. Double-click on the layer with the mouse to bring up Layer Style and apply Color Overlay . Then right-click on the layer effects and select Create Layers . Create a new layer above the “Side” layer and name it “Light”. Apply a Clipping Mask to it (CTRL+ALT+G), then take a soft white brush (B) and paint the light on the side of the spoon. After that, change the layer blending mode to Overlay .
Step 35 . To add light to the top of the spoon, create a new layer above the Spoon smart object and apply a clipping mask to it (CTRL+ALT+G). Take a large (>1000px) white brush (B) and paint a spot in the center of the spoon. Reduce Opacity to 58% and change the layer blending mode to Screen . Duplicate (CTRL+J) this layer and place a copy under the original. Change its blending mode to Overlay (Overlap) and Opacity (Opacity) 20%. Move this layer a little to the left and down. Bevel&Emboss layer style to the smart object .
Step 36 Activate the “Shadow” layer and apply the Motion Blur and Gaussian Blur to edit the shadow.
Step 37 Add a new horizontal construction line. Create a new layer above the background layer and call it “Light”, apply a large radial gradient in the center of the document. Duplicate (CTRL+J) the layer and rename both layers to “Top Light” and “Bottom Light”. Apply a layer mask to both layers as shown below. Unbind the mask to the “Top Light” layer (to do this, click on the button in the form of chain links between the layer and the mask in the Layers Panel), then stretch the gradient to the top to capture the central part of the document. Change the Opacity of the layer to 90%. After this, we activate the binding again.
Step 38 Create a new layer and fill it with black. Use a mask to hide the area shown below. Reduce the Opacity of the layer to 30%.
I also added a border and some text and placed a small label in the top corner.
Option from the translator:
Author: Gorm Haraldsson Translator : Max Enin Link to source
Source: www.psd.tutsplus.com
Unusual drawings on the foam of the world's best baristas
Over the past 10 years, latte art has been a leading trend in the coffee industry. They are interested in professional baristas who create masterpieces. For example, the Italian artist G. Fiorini depicts realistic images of birds and animals, demonstrating deep anatomical knowledge. And South Korean master Lee Kang Bin uses milk foam to reproduce miniature copies of artists’ paintings from photographs.
Coffee art is an opportunity to show your imagination.
Milk foam painting can be found in coffee shops.
The latte art movement originated in Italy.
Many baristas decorate people's facial features.
You can make a realistic image of a fish.
Many baristas decorate their coffee with images of people with well-drawn facial features and clothing.