Latte art is a technique of drawing a picture on coffee, which is popular in many coffee shops. For a cafe, this is a way to attract visitors, and for a barista, it is a way to hone their skills. However, you don't have to be a professional to know how to make coffee designs. You can learn the art of latte art on your own, the main thing is to be patient.
Latte art what is it
The technique by which drawings are created on coffee is called latte art. This art originated in Italy and eventually spread throughout the world. There are many different ways of drawing.
In some coffee shops, latte art is done not by a specially trained master, but by coffee machines using food coloring. Any visitor can upload the desired image from their smartphone and receive original coffee.
Although the art of creating coffee with a pattern on the foam is only alive until the drink is drunk, latte art techniques are constantly evolving. Latte art techniques are becoming more and more complex, and professional baristas are coming up with something new.
Master from Taiwan Kuai Fan Chang creates realistic 3D images in the form of spiders and various insects. They look so natural that it’s hard to decide to try even a sip. And this is not the limit of the development of latte art.
Championships are held around the world to identify the most talented artists. All you need for creativity is imagination, milk foam and barista skill. Some people are so eager to impress the jury that they create beautiful drawings blindly.
Cappuccino at home
To prepare two cups you will need:
- Ground coffee – 2 teaspoons.
- Full fat milk -300 ml.
- French press (Turkish).
- Container for frothing milk.
- Submersible (cup) blender.
Heat the milk (the fattier it is, the denser the foam will be), brew coffee in a Turk or French press. Pour warm milk into a container and beat until fluffy foam is obtained. For cappuccino, take 1 portion of brewed coffee and pour 1 portion of whipped milk on top.
Latte recipe
Lattes are traditionally served in a tall glass glass. Pour the whipped milk into it, turn the tablespoon over and pour the coffee in a thin stream over its handle so that it slowly settles and mixes with the milk. You should get a drink with the following layers:
- Foam on top
- There is a layer of coffee in the middle
- There is warm milk at the bottom
All that remains is to decorate a glass of coffee with a design, insert a colored straw into it and place it on a saucer. If the latte is being prepared for the New Year's table, the edges of the glass can be decorated with sugar. To do this, sprinkle the sugar on a saucer, dip the edges in honey or sweet syrup, dip the inverted glass into the sugar and swirl until the snow-white grains stick, forming a beautiful “snowy” rim.
Watch a video on how to make a drawing on coffee at home.
Making mochaccino
To make mocha or moccaccino at home, you need to warm a tall glass goblet and pour 2 teaspoons of grated chocolate into the bottom. Brew espresso coffee, pour it into a glass with chocolate and stir. Beat the milk to 60-65 oC and tap the container on the table, depositing the foam. Pour the resulting milk into the coffee, filling the glass to the top. They drink this aromatic coffee through a straw, moving it up and down to feel the taste of all the layers of this delicious drink.
DIY coffee stencil
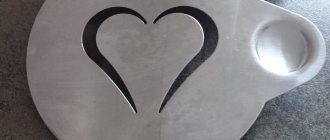
Stencils for drawings on coffee can be purchased ready-made, but if you want to get creative, you can easily make them yourself. To make the template you will need:
- plastic from boxes, thick stationery folders;
- permanent marker;
- sharp nail scissors (cutter, utility knife or blade);
- computer or laptop with LCD monitor.
First you need to find a suitable picture on the Internet. Then display it on the screen, cut out a square from a sheet of plastic, slightly larger in size than the image, and trace along the outline with a permanent marker.
If you have a printer at home, you can simply print out the design you like and then transfer it to plastic. After this, you should shade the places that need to be cut out, and, if the contours are complex, mark the jumpers with a marker. They must be left so that the template does not break later.
Then place the cup on the plastic and trace it along the contour so that the image is in the center. When making a stencil, it is worth providing a small handle for convenience. The resulting template can be washed and used for decoration several times. It can be saved and used for sprinkling cakes, casseroles and other types of sweets and cocktails.
Read about how much coffee you can drink per day without harm to your body. And also about chicory as a healthy substitute for coffee.
Development of your own stencil for drawing on coffee foam
Creative individuals often have a desire to do something extraordinary that others do not have and to show their individuality. You can congratulate your loved one on his birthday with a unique design or inscription by serving him a cup of coffee with a stenciled design for breakfast. Making your own stencil is quite easy, the main thing is to follow a few rules:
- It is important that the drawing is of a simple form, without too small details.
- It is necessary to follow the composition - the picture must be clearly inscribed in the circle
- Elongated lines should be avoided
We create drawings on coffee using a stencil
How to make drawings on coffee with a stencil yourself? After preparing the drink, you should choose the template you like and the topping to your taste:
- cocoa powder;
- chopped nuts;
- ground cinnamon;
- grated chocolate.
Place the sprinkles in a strainer, place the stencil over the cup and, gently shaking, distribute the contents along the contour of the design. The template should be as close to the foam as possible, then the drawing will be quite clear. It is important to ensure that the plastic does not touch the milk foam and coffee.
Moments of beauty
How to prolong the pleasure of a pattern created using a stencil on coffee foam? Usually such works of art last only a few minutes, but sometimes you can hold on to these moments and admire the picture longer to ensure a good mood for the whole day.
The following ingredients give the image durability:
- thick foam with added cream;
- slightly melted ice cream;
- foam from milk with high fat content.
Dense, thick foam can be achieved using an immersion blender by whipping warm milk in turbo mode. With this method of preparation, the foam will become the desired consistency within a couple of minutes. Those who don't have a blender or the patience to fuss with whipping can use store-bought cream in containers. With their help, you can practice 3D art and try to make three-dimensional figurines of kittens, fish or bears.
Have you ever been served coffee with a pattern on the foam? Did you like it and would you like to try painting on foam like this at home? Leave your message in the comments, and also watch the video on how easy it is to learn how to draw on coffee.
What kind of coffee can you draw on?
Not all types of coffee are suitable for latte art. First of all, it should be a thick drink with whipped foam. For latte art, espresso or cappuccino is most often used. They are usually decorated with patterns using frothed milk. But the drawings on latte have a darker tone, since they are drawn on light coffee foam.
High-quality espresso has a dense and dense foam, which is exactly what is needed for drawing. You can also draw on coffee foam; good coffee retains it for a long time. For greater aroma, cocoa powder is poured on top, which allows you to add new shades to the composition.
Why is there no foam when brewing coffee?
The lack of foam in the drink may be due to the following factors:
- Poor quality raw materials. Only high-quality fresh grains can produce foam, because it is formed from air bubbles and essential oils.
IMPORTANT: This rule applies to any type of coffee.
Beans are the main secret of making coffee with foam
- Coarse grind. It is not suitable for us - the foam will only come from finely ground grains.
- Beans that are ground long before the start of preparing a coffee drink will also not produce foam. They need to be processed literally before you want to brew coffee. Therefore, it is recommended to deal with each portion separately.
- Using high temperature water or tap water. Use only purified water. Or, if you don’t have the opportunity to clean it yourself, ready-bottled. And, as you understand, cold. Preferably ice cold.
- Cooking occurs over high heat. Coffee does not like high temperatures. Only when the fire is low does the foam begin to rise.
IMPORTANT: At the same time, it should not go beyond the walls of the Turk.
- The dishes were chosen incorrectly. In order for everything to be done as needed, purchase a copper pot with thick walls, a wide bottom and a narrow neck. You can also use a coffee maker with a steamer.
This type of pot is suitable for brewing coffee with foam
Varieties of coffee art
There are three basic areas of latte art that you need to master before taking on more complex patterns.
A heart is the easiest way to draw. First, you need to pour the cream into the coffee through the pitcher so that it spreads in the center of the circle. To turn a simple circle into a heart, just cross it out with a thin stream in the middle.
To get an apple, the drawing is drawn from the edge of the coffee cup, depicting an apple twig. Then simply add cream to the circle in the center of the cup.
Ideas for Beginners
Beginner baristas should be patient and practice drawing basic shapes. Of course, having previously prepared a high-quality coffee drink for use as a “canvas”.
You should not study more complex techniques until you can draw quickly and clearly:
- Heart - milk is poured at a distance of 5 cm into the center of the cup in a circular motion, after which the circle is crossed out with one sharp line. At the intersection of the circle, the foam will tighten and the entire pattern will take the shape of a heart. You can decorate it with topping or additional openwork lines along the contour.
- An apple is drawn in the same way, only first the stem is applied at the edge of the cup: a small amount of milk is poured in and extended to the fruit. Actually, it looks like a heart hanging on a branch.
- Flower - you need to pour milk from the far wall of the cup towards yourself, shaking the pinscher in a zigzag motion. At the end, draw a clear straight line right in the middle, holding the jug at a height of 15-17 cm from the surface. The foam will stretch along the drawn line and complete the drawing.
Applying basic images to foam will allow you to develop the skill of working with coffee foam and milk. And subsequently diversify your art with additional colors, ingredients and accents.
Coffee foam painting is popular all over the world. And the more complex the design, the more expensive the drink itself is, despite the fragility of the “work.” But you can learn how to draw different shapes on coffee at home. You just need to spend a little time watching training videos and practical experiments.
Techniques for painting on milk foam
To make drawings on coffee, you can choose a specific latte art technique or combine several at once, but first it’s better to practice on one thing. So, how to draw on coffee using different latte art techniques:
- Pitching technique. To make patterns on coffee, a special tool is used - a pitcher. This is a small jug with a thin spout. With its help, an image is drawn with cream directly on the coffee.
- Etching technique. The application of the image is done using a sharp stick. At home, you can use a regular toothpick for these purposes.
- Mixed media latte art. For drawing, etching and pitching are used simultaneously.
- Stencil. The easiest way to apply a design on coffee at home, you don’t need any special equipment, you can make a stencil yourself.
- 3D. The 3D latte art technique looks very impressive due to its three-dimensionality and realism.
- Engraving. Drawing in this technique involves applying syrup to coffee.
Knowing the basic latte art techniques, it is not difficult to understand how to make drawings on cappuccino and latte.
What is required for drawing
First of all, painting on coffee takes time. Not on the artistic process itself, but on learning and practice. You need to prepare for the fact that you won’t want to show your first “masterpieces” to anyone, and perhaps even drink it yourself.
If we talk about attributes, then you will need:
- coffee machine with espresso and milk frothing functions;
- pinscher - a jug for frothing milk;
- pointed drawing tools - toothpicks of various lengths and thicknesses, skewers for canapés, cocktail sticks and spoons;
- topping dispenser - a professional container for sprinkling drinks with cinnamon, almonds or grated chocolate, needed to give the design a monochromatic background.
With experience, you will want to expand your arsenal. Latte art experts advise acquiring a drawing pen or specialized utensils only after completing the initial stage of training, if you really enjoy drawing on coffee foam. So that later you don’t have to sell off the equipment as unnecessary.
DIY coffee stencils step by step process
It’s easy to make coffee stencils with your own hands. To learn latte art, you don't need to put in a lot of effort.
You need to have the required number of suitable templates. You can simply print the drawings you like on thick paper. Glue the template onto the cardboard more tightly and cut out the design itself using a sharp and thin stationery knife.
Make the stencil shape round, not forgetting the small handle. The diameter of the circle should match the diameter of the cup. Attach the finished stencil to a cup of poured coffee. Gently sprinkle the image with cinnamon, cocoa or finely grated chocolate.
Instead of homemade stencils, you can use a cappuccino decorator. Tin forms are suitable for reusable use.
How to brew espresso coffee with foam?
For this drink you need to grind the grains not just finely, but very finely. works very well for this .
IMPORTANT: As for the grains, they must be well roasted, but not overcooked.
a mixture of robusta and arabica coffee yourself , but you can also buy ready-made packaging marked “espresso”.
Next we do the following:
- Take a coffee maker and preheat it
- Pour the resulting coffee bean
- Compact it properly and start cooking.
If you did everything correctly, water will flow through the powder slowly . The foam should only rise a few millimeters.
IMPORTANT: As for the shades of the foam, it should be dark brown, nutty or light brown. White foam is wrong. It is a signal that either the grains were coarsely ground or there was not enough powder.
Espresso foam should not be white
Important points of latte art and the main mistakes that beginners make
A basic mistake is trying to portray something using regular milk and regular coffee. In fact, it turns out to be an Americano with milk, which, of course, won’t hold anything. But here are three other mistakes that are made most often:
- Milk pouring too slowly. This leads to stratification of the foam in the pitcher, and as a result there is no density at the bottom, but a difficult-to-pour mass remains in the jug.
- Incorrect lifting of the jug from the surface of the drink when pouring. When you lift the jug from the surface of the drink, the milk sinks into the layer of coffee rather than sitting on top of the cream. First we pour from a height, then we bring the spout to the surface.
- The spout is too close to the surface. This has the opposite effect, as the milk tends to slide across the surface of the rich coffee, so it doesn't create a pattern.
It’s worth trying repeatedly to learn how to make even the simplest drawings on a cappuccino or latte. But then you can decorate drinks without thinking!

