August 9, 2013 Equipment and accessories
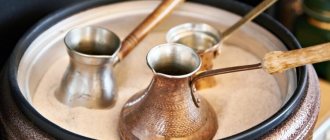
A pitcher is one of the barista’s tools, a container for frothing milk for cappuccino or latte. He is also the milkman or jug (jag). To prepare some coffee drinks (cappuccino and latte), milk foam is added to freshly prepared espresso.
The optimal utensil for preparing milk foam is a pitcher - a special stainless steel jug. Metal is predominantly used for their manufacture due to its good thermal conductivity, although there are also options made of aluminum, ceramics, glass and plastic, but they are not considered reliable.
Milk pitcher concept
A pitcher is a cone-shaped jug with which baristas get foam when preparing lattes or other coffee drinks. Such utensils are better suited for hand beating than mugs, shakers, and glasses.
Purpose of use
Jag is used in the process of frothing milk for lattes or cappuccinos. It can also be used to prepare espresso foam. The device will also be needed for latte art and decorating drinks with patterns.
Who needs it
The container is needed for manual beating. It can be purchased not only by a professional barista, but also by anyone who wants to drink coffee with foamed milk in the morning.
The need for a pitcher will not arise for owners of coffee makers or coffee machines with an automatic or semi-automatic cappuccino maker. If you purchase a separate frother, you can also avoid purchasing a jug.
Why do you need a pitcher?
The coffee machine makes delicious coffee drinks with lush milk froth, but if it does not have a cappuccino maker, additional equipment will be needed for preparation: a whisk and a pitcher (jug).
Lovers of cappuccino, latte, and macchiato cannot do without a pitcher. Professional baristas strongly do not recommend replacing it with a regular cup or jar. The fact is that during operation it is important to strictly control the temperature. If steam heats milk above 70°C, it will acquire a “boiled” taste and the foam will settle.
Original jugs are made from materials that conduct heat well, so when whipping, the heating of the walls can be controlled simply by hand. As soon as the body becomes hot, foaming is stopped.
If you don't have a coffee machine, you won't need a pitcher. He does not know how to heat and froth milk on his own. But it can be used as a regular milk jug for serving.
Criteria for choosing the right milk jug for coffee
When choosing, consider the volume of the product, material, and the presence of a handle.
Material of manufacture
Pitchers are made from a number of materials:
- Of stainless steel. The material is best suited for making milk jugs. The good thermal conductivity of the metal allows the barista to sense in a timely manner that the contents of the container have become hot and stop whipping. Steel does not react with food and does not impart an unpleasant taste or odor to the drink.
- Plastic. Pitchers made from this material are cheaper. The product, however, is easier to damage during operation. In addition, the material reacts with the contents of the container, causing the coffee to have an unpleasant aftertaste and spoil the aroma.
- Aluminum. Such jags are not very comfortable due to poor thermal conductivity. It will be difficult for baristas to keep track of when the milk has warmed up. Because of this, foam with a boiling taste and bitterness may get into the drink.
- Ceramics. Ceramic products are not very convenient due to their fragility. In addition, their thermal conductivity is worse than that of metal, which will make it difficult for beginners to work with. Some housewives, however, prefer ceramic pitchers because of their appearance.
Materials for making a pitcher.
Pen
For beginners, it is better to choose products with a handle that is comfortable to hold. Experienced baristas can purchase a milk jug that does not have this part at all.
The product has a comfortable handle.
Volume
The volume is selected depending on how many people the coffee will be brewed for. To whip up foam for one drink, a container with a capacity of 100 ml or more is suitable.
For two, it is better to choose a jug with a volume of 350 ml or more. If you drink latte or cappuccino in the office, or prepare it for a large family or company, it is recommended to purchase a milk jug that holds 1-2 liters of liquid.
Containers with different volumes.
After purchasing a coffee machine or coffee maker, the next step is usually choosing accessories. For automatic coffee machines, this issue is not as acute as for carob coffee makers, but some things will be useful for grain machines.
For example, if you bought a coffee machine with a manual cappuccino maker and want to prepare milk and coffee drinks, a milk frother may make your task easier.
A pitcher (also known as a jug) is a vessel, a milk jug, in which the barista whips the milk before pouring it into cups. Used in the preparation of cappuccino, latte and other milk-coffee drinks
Let me clarify right away that for coffee machines with an automatic or semi-automatic cappuccino maker, as well as in the case of using a separate milk frother, the pitcher is irrelevant.
The pitcher is useful specifically for manually steaming milk. The steam frothing process itself is not so simple, and according to statistics, approximately 10% of users are unable to cope with the manual cappuccino maker of their coffee maker or coffee machine. With experience and skill, on the contrary, you can froth milk with a steam nozzle even better than with an automatic cappuccino maker.
There are a few things that will make using a steam tap easier:
- Knowledge of whipping techniques
- Proper milk
- Eligible Milk Pitcher
What is a milk pitcher?
I repeat, a pitcher is just a container, an analogue of a milk jug, except that it has a slightly special shape. In principle, the pitcher can be made of both plastic and ceramic. The standard for beginners, which I advise you to focus on, is a metal thin-walled pitcher. Painted metal pitchers with a non-stick coating are available on sale. In principle, to suit the interior, the design of the coffee maker, they can be safely used; this does not affect the whipping process, but I personally prefer without any coating.
The metal was chosen as the standard for a reason. When frothing milk, it is extremely important to bring and complete the process at a certain temperature of about 65-68°C. 60-70°C is acceptable. It is within these limits that milk begins to naturally sweeten without added sugar. If milk is overheated above 70°C, then in addition to the absence of a harmonious sweet taste (it disappears after 70°C), you will get a boiling taste, bitterness (they appear after 75°C). Up to 60 degrees, milk may simply be too cold for you, although in principle no one forbids adding 60-degree milk to the drink.
So, during the whipping process, you hold the pitcher by the bottom or the wall with one hand so that you can feel the temperature of the milk with your hand. You have to stop when your hand can no longer bear it. The second sign of a good pitcher is form. Usually it is a smooth cone slightly narrowed at the top with a clearly defined nose. Using this spout not only makes it easier (and easier to draw latte art) to pour milk into coffee, many baristas use it as a stop for the steam nozzle - they place the nozzle at an angle (and it is really better to hold it at an angle to the surface of the milk) directly into this spout , additionally fixing the pitcher, which allows you to be distracted by something else.
What size are coffee machine pitchers? How to choose the size?
Typical options: 350 ml, 500-600 ml, 1 liter. But in general, pitchers are very different, from 100 ml to 2 liters. It’s just that these volumes are the most popular.
When choosing a pitcher, it is important to understand how much milk you will typically froth at a time. Whisking in two batches is tedious if you drink large portions of dairy drinks. Frothing a small volume of milk in a large pitcher is particularly inconvenient. You need to assume that it is optimal to fill the pitcher from a third to a half.
That is, roughly, a 600 ml pitcher is for whipping from 200 to 300 ml of milk.
When milk is whipped, it increases in volume depending on the degree of whipping. You control the degree of whipping yourself depending on the drink you are preparing. Roughly, for a cappuccino the whipping is maximum, for a latte – seriously less. But for simplicity, you can focus on 2x magnification.
Thus, a 300-350 ml pitcher is just enough for about two servings of cappuccino. For 500-600 ml - for two latte macchiato.
Here you can find that a 100-150 milliliter pitcher is ideal for you, because you make one cappuccino for your wife and that’s it. Everything is correct, but here a subtle point emerges. The less milk, the more difficult it is to froth it properly without overheating. No, it is quite possible, but more difficult. Therefore, beginners often use a larger vessel and froth more milk than necessary, simply because it is easier for them. Personally, I don't see much point in buying a small pitcher in principle.
The opposite is also true. A pitcher that is too large is not always convenient when you need to froth a small amount of milk. If only because in this case you will have to insert the pannarello cappuccino maker deeply inside the pitcher, and this is not always possible due to the length of the cappuccino maker. For example, the popular line of Delonghi ECP31.21/33.21 carob coffee makers has a steam tap length of only 9.5 cm; there is no way to lower it lower - the pitcher rests on the metal steam supply tube. You simply won’t be able to reach the milk and you will always have to pour more than you need.
And for some coffee makers, a large pitcher is completely contraindicated for any volume of milk. Take, for example, another popular model of home carob coffee makers - Saeco Poemia. Due to the small height “under the pannarello”, a large jug simply will not fit there, or it will be very difficult to move and tilt it.
Finally, the height of the coffee maker and its cappuccino maker is important if you like to reheat the milk after frothing by lowering the steam valve to the bottom of the pitcher. So before purchasing, it is better to decide on the desired volume and take into account the dimensions of your specific coffee machine/coffee maker.
What about pitchers with a built-in thermometer?
Yes, such models exist. But it’s precisely that I personally have never encountered the built-in one in real life. They are rare. The second subtle point is that I have only seen it on sale from the Chinese (for example, on Aliexpress), and I have concerns about the accuracy of such a temperature sensor. In any case, with experience, you will not have any problems determining the temperature of milk with your hand.
If you are a beginner, then a good solution would be to choose a separate immersion thermometer (for example, a “brand” ILSA or a nameless analogue half the price on Ali). They are quite accurate (at least a couple of the ones I've tried) and can really help in the early stages of learning the foaming technique. Then, when you get used to it, you can simply not use it.
On the left is a pitcher with a built-in thermometer. On the right is a pitcher with an immersion thermometer mounted on the edge.
Where can I buy this milk pitcher?
In fact, the pitcher is not such a common thing that is sold on every corner. It’s generally extremely difficult to find them right away in an offline store near your home, except that METRO C&C definitely sells them (made in India). In theory, they should be in kitchenware stores, but I haven’t checked. Tip: Sales consultants usually don’t know what a pitcher is, so it’s easier to ask to find a “metal milk jug.”
In Russian online stores:
- Official online store Delonghi.ru (-10% with promotional code 101kofemashina)
- Online store for fresh coffee Torrefacto
- Online store for fresh coffee Tasty
- The all-knowing Yandex.Market will suggest a dozen more options
And as usual, the cheapest is from China from Aliexpress:
- Regular unpainted, classic - once
- Fashionable multi-colored - two
Photos used in the text by Angie Chung under an Attribution-ShareAlike 2.0 Generic license
Additional Capacity Options
When choosing cookware, consider a number of additional options.
Wall thickness
Beginner baristas should choose thin-walled products. When using such pitchers, it is easier to determine the temperature of the contents. Experienced professionals can buy cookware with thick walls. Such jags take away some of the heat, so you can froth the milk longer and get a more fluffy, delicate foam.
Built-in thermometer
The built-in thermometer allows you to accurately determine how hot the milk is. This function is especially convenient for beginners who have not yet learned how to stop whipping in time.
The cost of jags with a thermometer, however, is much higher than that of simple containers, and you won’t be able to find such utensils in any store. Sensors often break down and show incorrect information. It is better for beginners to use an immersion thermometer, and baristas are trained to determine the degree of heating by tactile sensations.
Pitcher with built-in thermometer.
Form
Consider the shape of the spout if you are going to do latte art. To create designs on the surface of coffee, you will need a product from which milk will pour out in a thin stream.
Pitcher with a long nose.
Color
Color coating has no practical use. Housewives, however, often choose bright pitchers that match the style with other dishes.
Features of choice
To make the pitcher convenient to use, you need to choose it correctly. First of all, pay attention to the material of manufacture.
The best models are made from stainless steel. This metal is durable, reliable and is considered a good heat conductor. For inexperienced coffee drinkers, it is better to buy pitchers with thin walls - they provide quick heating and allow for better temperature control.
Thick-walled pitchers are suitable for professionals. In them, the whipping is slower, but the foam is more fluffy.
Ceramic, glass and plastic milk jugs are rarely found on sale. It is difficult to control the heat in them, so beginners often overcook the milk and its taste deteriorates.
Not everyone is able to control the temperature with their hands. It takes time to master this art. A pitcher with a temperature sensor monitors heating and reduces the risk of errors when learning whipping techniques. If it is difficult to find a jug with a built-in sensor, buy a separate immersion thermometer that is attached to the walls of the vessel, or an external indicator sticker.
The pitcher's handle is usually made wide. When purchasing, be sure to hold onto it and make sure it is comfortable. Some manufacturers produce models with special thermal insulating linings. Thanks to them, the container can be fixed in any position.
Choose the volume based on how many servings you whip milk at a time:
- 70-100 ml is enough for one cup;
- For two - 350 ml;
- Pitchers of 600-1000 ml are in demand for large families, coffee shops and bars.
The functional accessory has a clearly defined and thin nose. Otherwise, it will be more difficult to dose the foam and draw patterns on the surface of the coffee.
Places of purchase and average cost in stores
You can buy a milk jug in a specialized boutique that sells tableware for coffee shops, bars, or coffee accessories. Products are also offered in the online stores Boffo, Tasty, and Yandex.Market. The cheapest pitchers can be found on AliExpress.
The cost depends on the volume and material. A 100 ml ceramic pitcher can be bought for 400 rubles. A metal product is more expensive: the cost starts from 700 rubles.
Milk jugs holding 1 liter or more sell for 2,400 rubles. The price increases additionally for painted products, jugs with Teflon coating or a thermometer.
Buy quality pitchers from specialized coffee shops.
How to choose the right pitcher
When choosing, pay special attention to its walls. Experienced baristas prefer pitchers with thick walls. They warm up more slowly, which will allow you to whip up the foam longer. As a result, it will be softer and more voluminous. Beginners often choose thin-walled pitchers for two reasons: firstly, they are cheaper, and secondly, they have less heat capacity and the temperature of the milk can be felt with the palm of your hand faster and more accurately.
Pitchers come in different volumes, from 150 to 1000 ml, but no matter what volume you choose, you only need to fill the pitcher halfway with milk.
The shape and size of the pitcher's nose are of particular importance. The formation of a thin laminar stream of frothed, finely divided milk is very important for the art of latte art. Sometimes there are options with a built-in heat indicator.
Usually the pitcher has a metal handle, but there are also models without a handle, with a plastic heat-insulating apron.
Teflon-coated pitchers are considered a new trend. Milk sticks to them less, they are easier to wash, they are stylish matte black, white or colored ones are less common. The trend of the season is colored powder-coated pitchers in black, white, red, yellow, green and other bright colors.
There is no practical benefit from such coloring, but they look bright and unusual, creating the style of a coffee shop and working positively on the image of the barista.
Popular brands of pitchers: Motta, Exxent, Rattleware, Cafelat, Ilsa, Milkypitch, Nuova Ricambi, Coffee Parts, Espro Toroid. The most expensive ones are produced by Alessi - from $150 apiece.
Step-by-step instructions for whipping
To get a thick foam, follow the algorithm:
- Using the steam tap, remove condensation from the container, which can spoil the taste of the drink.
- Fill the pitcher halfway with milk. Immerse the steam tap into the liquid by 1-1.5 cm and use it to heat the contents of the container to +37°C. At this stage, the milk should not be overheated, since its taste will deteriorate and the foam may not be thick enough.
- Open the tap to start frothing. Bubbles should appear over the entire surface of the liquid.
- Keep an eye on the sounds as you go. There should be a uniform hissing sound. Gurgling or muffled sounds indicate that the faucet is immersed too deep. If the milk splashes out during the process, the immersion depth is insufficient.
- Then proceed to steaming. This phase lasts from 5 to 15 seconds. Stir the milk continuously in a circular motion as you go. This way the contents of the container will become homogeneous and evenly warm up to +70°C.
- When the process is complete, remove the faucet. Then lightly tap the sides of the pitcher to settle the bubbles. Shake the milk mass until it gets into the coffee.
Immediately after finishing work, wash the pitcher from any remaining milk.
How to choose the right milk for frothing
The milk for whipping should be:
- Whole, fatty. The most suitable fat content is 3-3.5%;
- With a high protein content, from 2% and above;
- Homogenized, that is, homogeneous microstructure;
- Not boiled, not beaten, not heated - i.e. undenatured;
- Chilled to a temperature of +4°C.
Although it is recommended to use milk with the highest fat content for whipping, it is not the fat content of the product that affects the whipping ability, but its protein compounds. When whipping foam, do not fill the pitcher more than halfway and heat the milk to a temperature above +65...+75°C. At this temperature, protein compounds will begin to break down, good foam will not work, and the milk itself will acquire an unpleasant odor and a bitter taste of boiled milk.