Crafts made from coffee beans are an unusual and modern creativity that has great practical significance.
In recent years, an incredibly fashionable trend called “handmade” has become a popular and exciting pastime. In recent years, skilled craftswomen have been using various materials and devices for their handmade creations, and now crafts made from coffee beans are at the peak of popularity, because it turns out that they are suitable not only for creating a fragrant drink, but also for creating equally fragrant decor and interior item.
Coffee crafts for beginners, master class
Mastering the technique of creating a masterpiece from coffee beans is not such a complicated science and anyone who has at least a little ability to manipulate objects and has a little creative imagination can do it. It's better to start with simpler crafts for beginners.
A variety of materials can be used in coffee crafts.
For unusualness and diversity, grains can be painted in different shades. Creativity is a path in which initiative is not punished. Show your imagination
It can be:
- decorating a vase, jar, glass
- creating a photo frame
- decorating candles, candlesticks
- postcard
- decorative painting
Coffee beans are a universal material
If you decide to try to create a small masterpiece that will decorate your home, then the first thing you should do is buy the right coffee beans. Packed packs of coffee in opaque containers, in which you cannot see the purchase, are not suitable for this - it is better to give preference to stores where coffee is sold by weight.
Also, you should not buy Arabica beans, since for greater unusualness and texture, beans of different sizes are required. Therefore, give preference to the cheaper variety.
It is better to use grains of various sizes in your work, rather than selected Arabica coffee.
The simplest coffee crafts do not require many tools - all you need is a glue gun and a blank for decoration on which the grains will be glued.
After completing the work, it can be coated with colorless varnish.
How to choose the right one
When choosing coffee for display, pay attention to the varietal difference.
- The oval shape is characteristic of the Arabica variety.
- Round - for Robusta.
To implement creative ideas, it is more advisable to choose Robusta, because its price tag is relatively lower.
Crafts from twine and coffee
An extraordinary vase, cup or even flower pot can be made from twine and coffee beans. The simplest option would be a decorative scented candle, which you can not only use for aesthetic purposes in your home, but also give as a gift to loved ones.
Candles decorated with coffee beans look very original
To make an unusual candle you will need:
- scented candle
- leg-split
- glue or glue gun
- coffee beans
- clear varnish
Making a decorative candle is very simple, and the end result directly depends on your imagination:
- First, you need to tightly wrap the candle with twine 2. This can be done around the entire circumference of the candle or to its middle 3. After this, use a glue gun to secure the ends of the twine to the candle so that it fits snugly to its surface, without protruding or forming a void . You can also do without glue by melting small sections of the candle and pressing the twine into the surface of the candle 4. The candle wrapped with twine is covered with coffee beans to the middle, doing this in rows, so that the layer of twine under the grains is not visible 5. At the final stage, the grains are painted with colorless varnish , which will provide shine and make it easier to wipe the structure from dust in the future
candle. You can decorate the finished candle with beads if you want to give it a more festive look or immerse the beans inside the melted wax along the edge of the candle.
Photo frames
It is impossible to count the number of ideas in the design of photographs dear to the heart, but the classic version does not lose ground: a rectangular frame with a side width of 4-5 cm for a photo measuring 10x15 cm is at the peak of popularity due to its external elegant simplicity. However, the base uses a strong material - plywood - which will forever retain the shape of the product. To cut a wooden sheet measuring 20x25 cm with an internal window of 9x14 cm you will need a jigsaw, and probably an assistant with physical strength. Anyone can handle lightweight corrugated cardboard. It is the same size, only the opening inside corresponds to the size of the photo. Glue everything together, paint it dark, apply glue on top, attach grains on a whim, varnish, cut out a cardboard holder, and secure it with paper clips at the back. The photo frame is ready, but move it away from the bedside table. Caffeine in aromatic form right under your nose will keep you from falling asleep.
Craft a coffee heart
You can please your other half by presenting her with a heart made of coffee beans. It's easy to do and doesn't require much time. For the heart you need:
- coffee beans
- A4 paper
- cardboard
- scissors
- cotton wool or cotton pads
- glue gun or regular glue
- leg-split
- brown paint
- decorative decorations: beads, lace, ribbons, bows
First, you need to cut out the blanks. Perhaps you will be able to purchase a ready-made heart made from foam plastic at a handicraft store, then your work will be much easier. If you want to create a masterpiece entirely on your own, then you should start by creating a paper heart.
It is necessary to cut out a symmetrical heart
You can buy a ready-made foam heart at a craft store.
Sequence of work:
- Fold the A4 sheet in half and draw half a heart, so that when you turn the sheet you get a whole symmetrical heart
- Attach the heart to a piece of cardboard and redraw it
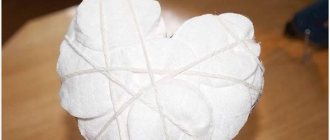
- Glue a layer of cotton wool to the resulting heart or lay out cotton pads with balls, increasing the volume of the figure 4. After this, the heart is encircled with twine in a free order in all directions to form relief 5. Next, the heart is painted: a foam sponge is suitable for this, which is used to apply the paint with blotting movements 6. After the paint has dried, glue the coffee beans to the heart: spread each bean with glue and place tightly to each other 7. The final stage is painting the craft with colorless varnish
The finished work can be decorated to your taste
Kitchen decor
This coffee craft is ready to hide in any kitchen corner. A box with a butterfly for storage, a tree of happiness in a mug with a food print, a napkin holder with a slyly winking kitten. In general, the cat theme is very common in handmade design, and where else would a pet belong if not in the kitchen. And so as not to interfere, we will give it a place on the refrigerator.
The magnet cat should be light so as not to fall. Ceiling tiles will do. Draw a sketch, not forgetting the long curled tail. Cut it out, paint it dark, glue the elements on one side and magnets on the other. It is better to use 2 pcs. In order to process the end, glue 2 strips of jute onto a thin strip of hot-melt adhesive. All that remains is to outline the mustache, nose and eyes. A medicine blister is suitable for them. Place one grain at a time in the recesses, cover the back with paper, and cut along the contour. The cat has a very soulful look.
Craft painting made from coffee
For beginning needlewomen and crafters, creating a picture from coffee beans will be a great way to spend time. It will not only become a wonderful piece of furniture that will fit into almost any stop in your abode, but will also be a good gift for loved ones. The subject of a “coffee” painting can be very different: from a traditional steaming cup of coffee to a grandiose artistic canvas.
The plot is limited only by your imagination.
For a painting made from coffee beans you will need:
- thick cardboard
- a piece of fabric (preferably light and smooth, but if coarse burlap fits into the concept of your masterpiece, feel free to use it)
- glue
- coffee beans
- leg-split
- stencils
- picture frame
- decorative beads, ribbons or even dried leaves
- clear varnish
The process of making a picture is not labor-intensive and requires only accuracy and creativity. By following the step-by-step guide, you can easily recreate your intended image from coffee beans:
- Cover a thick sheet of cardboard with fabric, securing it with glue on the opposite side 2. Think over the plot of the picture and use stencils to draw the image (if there are no stencils, then a simple device will replace them: print the picture onto a thin sheet of paper and, outlining it with cosmetic shadows or blush, transfer the drawing onto canvas ) 3. After this, carefully glue the coffee beans 5. Decorate the outline of the picture with twine, attaching it to the picture with glue 6. The finishing touch: cover the coffee beans with colorless varnish, and after drying, insert the picture into the frame
In order for the picture and frame to be in the same style and color composition, it is better to choose a dark brown frame. This way the painting will create the impression of completeness and will please the eye with its aesthetics.
Christmas decorations
The leadership in the variety of options in this category was captured by:
- balls on bright satin ribbons, with and without tassels, decorations made of rhinestones, sequins, charms, keys;
- five-pointed stars of all types, sizes, colors, with the addition of gilding and silvering;
- Christmas trees with artificial snow, generously sprinkled with glass beads, strict and with humorous emoticons;
- houses with a rustic flavor;
- powerful horseshoes for good luck at home;
- three acorns for Cinderella;
- animal symbol of the year according to the eastern calendar;
- confectionery cookies;
- hearts pierced with a cinnamon stick, of course.
New Year's crafts are easy to make, but they are good not only for their external impression, but also for the opportunity to create something beautiful with the whole family, to have fun with your children and remember their “designer” toy all year long!
DIY coffee bean topiary
For those who consider paintings made of coffee and candles covered with coffee beans to be child's play, there is also a more difficult craft - topiary. This “tree of happiness,” as it is commonly called in Europe, will become a real work of art, and the time spent on the topiary will pay off in spades when all the guests begin to admire such a sophisticated masterpiece and even envy your skill.
Topiary is modern and fashionable
For topiary you will need:
- coffee beans
- thick cardboard
- A4 paper
- glue or glue gun
- small jar or box, cut bottle
- clothespins
- brown paint (you can use quality paints for painting)
- thick wire
- gypsum
A ready-made blank can be used as a heart
Sequence of work:
- Folding a sheet of paper in half, draw half a heart and cut it out so that when you turn the sheet you get a whole heart 2. Attach the paper heart to a sheet of cardboard and redraw it, and then cut it out with scissors 3. Glue a wire or a curved wooden branch, forming a topiary trunk 4. Using cotton wool or cotton pads laid out in layers, create the volume of the figure by gluing them to a cardboard heart 5. Wrap the resulting heart with twine in different directions to secure the structure. Use it to tightly wrap the wire to the very end 6. Paint the resulting structure using a small foam sponge 7. While the painted tree dries, form a pot for it: separate the wooden clothespins and paste them around the jar or box, so as to create the impression of a wooden tub. You can paint the pot any color, or you can leave it as is 8. Cover the dried “crown” of the tree tightly with coffee beans so that they fit right next to each other and no empty gaps are visible. You can lay the grains in several layers, on top of each other - such chaos will only add gloss to the craft 9. Fill the finished topiary pot with plaster and place the tree in it 10. After the plaster has dried, the tree can be decorated with ribbons, flowers and beads to your taste
Topiaries come in many different shapes
Original ideas
Modern handmade craftswomen never cease to amaze with their fantastic crafts. Each of them is individual and carries a part of the soul of its creator. Let's look at the most interesting and unusual crafts made from coffee.
To make a mill you will need:
- a round tall jar, for example, from children's tea;
- twine and glue;
- two sheets of thick cardboard;
- barbecue sticks, matches or toothpicks;
- a piece of gray linen fabric.
The process is step by step.
- Cover the jar tightly with twine.
- For the roof, cut a circle out of cardboard, make a cut and secure with a cone. Pre-paint white cardboard brown. Decorate the roof with grains, leaving free space for attaching the mill blades.
- Cut them out of thick cardboard. Attach barbecue sticks to the sides of each blade so that they extend beyond the edge of the cardboard. Wrap the workpiece with thin twine, covering the cardboard base. Stick several grains in the center of the blades.
- Glue the finished blades to the roof of the mill and now fill the remaining gaps with coffee.
- Make the door from matches or toothpicks glued together.
- For the base of the mill, cut out a circle from cardboard and decorate it with linen fabric. To imitate a fence, place coffee beans around the edges.
- Connect both parts of the craft. Add additional decor if desired. For example, bags of flour, a horseshoe and a broom.
Flower as a gift
An original and unusual product made from twine and coffee beans will be a pleasant gift for any occasion.
You will need:
- a piece of rigid wire that will hold its shape well;
- leg-split;
- alabaster and flower pot;
- coffee beans;
- glue gun
Performance.
- Cut the wire into pieces according to the number of expected petals. Fold each one in half and twist, leaving a loop at the top.
- Using twine using the ganutel technique, braid a loop and wrap the wire just below the petal. Do this for all the petals and a couple of leaves for the flower.
- Assemble the flower itself, tightly twisting the wires together to form a stem. Wrap it tightly with twine.
- Dilute alabaster and pour it into a flower pot. Insert the stem and hold until the solution sets.
- Now you can decorate the petals and leaves with fragrant grains.
- Additionally, decorate the pot with hemp rope or twine.
Coffee crafts are a popular handmade trend. They are beautiful, made from natural materials and do not require large expenses. A handcrafted item will fit perfectly into the interior and fill the room with a pleasant aroma.
Originally posted 2018-03-19 10:27:40.
Coffee bean trees
If the heart-shaped crown seems irrelevant and uninteresting to you, then you can form a topiary with a spherical crown. To do this, you will need a blank, which can be purchased at a craft store, in the form of a foam ball, or any ball that you can find at home and the material of which allows you to attach it to a wire.
Topiary with a spherical crown
Making a spherical topiary is practically no different from a topiary with a heart-shaped crown, but the work will be greatly facilitated due to the fact that the initial stages of crown formation can be skipped and you can start immediately by painting the crown brown. Next, you need to follow the instructions outlined above.
“Trees of Happiness” You can decorate topiaries with all available means
Topiaries can be bonsai style
Coffee beans can be used to make other trees
Candles
In addition to its decorative function, such a candle will become a natural flavoring agent for the apartment. Unfortunately, such ethno-accessories in stores are offered to buy quite expensively, but if you know the step-by-step process, then you can actually make an original thing with your own hands much cheaper. In addition, it can be an excellent souvenir for friends on New Year's holidays.
For this you will need:
- Jute rope.
- Candle.
- Coffee.
- Glue.
Manufacturing mechanism:
- Place the seeds on the bottom of the candle on the glue. Choose the order according to your preferences - it can be a pattern with gradation of shades or a random arrangement.
- Wrap with jute and form a bow.
This is interesting: if you have jars of baby purees left over, you can use them for decoration by placing a wick in them and melting a regular white paraffin candle inside, and pasting them around the perimeter with grains.
Crafts from coffee and beans
By combining coffee beans with beans of different colors, you can create interesting applications, flower bouquets and paintings, as well as toy figures. In addition, these materials form interesting unique interior details that no one else will have.
Beans and coffee go well together in a craft.
A craft made from an elegant bottle filled with beans and coffee beans will be simple and original. To do this, you need an empty bottle of some alcoholic drink that has a bizarre shape. By filling it to the top with layers of white beans and coffee beans, you will create an unusual craft that will decorate your home or the austere atmosphere of your workplace.
Bottles filled with grains, cereals and salt are a popular decorative element of the interior.
Bottles are decorated with coffee beans
Pictures made from beans and coffee beans look very colorful and aesthetically pleasing. The principle of their creation is no different from “coffee” paintings, but the difference in texture and color of the material gives a flight of fancy.
Coffee beans and beans can be used to cover jars, vases and boxes, making them unique
Crafts made from coffee and burlap
Using simple materials such as coffee beans and burlap, you can recreate real masterpieces of applied art. The most common type of material used is to make panels from coffee beans, because it is simple, practical and looks very beautiful.
Even a person far from this technology can easily make a small creation.
To make a panel you will need:
- coffee beans
- sackcloth
- leg-split
- bamboo sticks (can be purchased at a craft store)
- glue
- stencil
- pencil
- clear varnish
First of all, you should think about the plot of the panel, what you would like to depict. For beginners, it is better to choose a simpler design: a heart, a cup of coffee, some kind of inscription, an apple, etc. Having completed this task well, you can easily begin more difficult work, which will require some experience and perseverance.
You can create entire compositions from “coffee” crafts
Operating procedure:
- Using scissors, cut the burlap to the required size 2. Redraw the outlines of the picture using a stencil and pencil 3. Glue the coffee beans according to the idea 4. Cover the beans with varnish and wait until the panel dries 5. Using twine, form a frame from bamboo and tie the panel to it by pulling the twine through the holes in the burlap
Bamboo can be replaced with another tree, but the picture will lose a lot from this
The step-by-step process of making panels
The simplest product is frames for decorating your favorite photo or interesting painting. Choose a suitable cardboard frame, apply glue with a brush and glue the grains to the surface at your discretion.
To make panels, we make markings on the base. Moreover, the burlap can be decorated in different ways: using a piece of cardboard, fold it over to the back side and glue it, or you can “ruffle” the edges and give the panel a piece of “boho” style.
Then, using a simple pencil or a bar of soap, apply the design of your choice. Now you can get creative directly.
How to make crafts from coffee beans: tips and reviews
At first glance, many crafts made from coffee beans seem incredibly complicated, but this is far from the case. Most needlewomen who have delved into this creative direction and reached great heights of skill urge them not to be afraid to experiment and not stop even if something doesn’t turn out quite the way they wanted it to be.
After analyzing their experience, we can highlight the following tips that will help you in working with coffee beans:
- Use quality material for your crafts. This does not mean that you need to buy everything expensive - much can be found at home for free.
- use your imagination and experiment, don’t try to copy other people’s work, but create something new and unusual
- learn to enjoy the process of creating a creation, then it will come from the soul and please the eye
Fragrant candlestick
On New Year's holidays, a warming ray of hope for a good future means a little more than on other days. The symbolism and dancing reflections on the ceiling elevate candles to the rank of a Christmas miracle. It’s especially nice to know that you can create these miracles with your own hands. The fastest way to make a candle and coffee make friends is to simply place them together. Pour grains into a small beautiful porcelain bowl and place a candle in the sleeve in the center so that it sinks slightly. The effect of natural aromatization is obtained; warm streams of air from the flame will spread a pleasant aroma throughout the room. Depending on the design of the room or holiday table, instead of a bowl, you can use any container except one that melts easily. Transparent glass with shaped inserts looks impressive.
An interior with coffee candles is a natural aphrodisiac for a romantic atmosphere.
